# How to send automatic birthday wishes on WhatsApp?
Do you frequently forget to wish your friends and loved ones a happy birthday? Do you want to send them a message at a specified time? In one of my previous blog posts, I explained how you can [send email birthday wishes automatically](https://ashutoshkrris.medium.com/automated-birthday-wisher-using-python-b39e09f8c2c4). You can find an Automatic Birthday Wisher called **PyWisher** built using Django here. PyWisher asks for your data and will send a birthday wish email to the person every year on their birthday.
This blog will teach you how to automatically send birthday wishes on WhatsApp. The messages will be sent via Twilio's WhatsApp API, and APScheduler will be used to schedule regular messaging operations.
## Prerequisites
1. You should have a Twilio account. If you don't have one, signup for one using [this link](https://www.twilio.com/referral/0zDjQA) to receive an additional $10 credit.
2. You should have WhatsApp installed on your phone.
3. You should have [activated WhatsApp Sandbox](https://console.twilio.com/us1/develop/sms/try-it-out/whatsapp-learn?frameUrl=%2Fconsole%2Fsms%2Fwhatsapp%2Flearn%3Fx-target-region%3Dus1).
4. You should get your **Account SID** and **Auth Token** from your account dashboard.
5. You should have Python (and pip) installed on your system.
## Setting up the project
Using your command prompt, create a new directory for this project named Whatsapp-Birthday-Wisher. Next, open this new directory in your favorite IDE. We're using VS Code for the sake of this article, and hence we can use the `code` command to open the directory in VS Code.
```bash
mkdir Whatsapp-Birthday-Wisher
code Whatsapp-Birthday-Wisher
```
For this project, we'll make a new virtual environment so that the dependencies we need to install don't conflict with your computer's overall configuration. Execute the following commands to build a brand-new environment called "**env**":
For Windows users:
```bash
python -m venv env
source env/Scripts/activate
```
For Linux/Mac users:
```bash
python3 -m venv env
source env/bin/activate
```
This new env/ directory should be added to the **.gitignore** file if you are using git as your version control system so that git is aware not to track it.
```bash
touch .gitignore
```
Open the **.gitignore** file, and then add the **env/** folder to its contents:
```txt
env/
```
The Python packages required for the project are:
* [twilio](https://www.twilio.com/docs/libraries/python) - provides access to the What’sApp API
* [pandas](https://pandas.pydata.org/pandas-docs/stable/getting\_started/install.html) - makes the birthday dates easier to work with
* [apscheduler](https://pypi.org/project/APScheduler/) - runs our function at a specific time
* [flask](https://pypi.org/project/Flask/) - provides the web server for our project
```bash
pip install twilio pandas apscheduler flask
```
Once all the dependencies are installed, you can list them in a requirements.txt file using the command:
```bash
pip freeze > requirements.txt
```
#### **Setting up environment variables**
To communicate with the Twilio API, you must use the Account SID and Auth Token you obtained at the start of this tutorial. The values of these two environment variables shouldn't be included in the code because they should be kept private. In order to prevent git from tracking them, we may instead put them in a **.env** file and list the .env file in our **.gitignore** file. Every time you need to make environment variables available to your operating system, the **.env** file is used.
```bash
touch .env
```
Add the **.env** file as a line item in the **.gitignore** file:
```txt
env/
.env
```
The next step is to add the following lines to the **.env** file, replacing the random string placeholder values with your own values:
```txt
export ACCOUNT_SID=ABlfkjsdljflksmk133392
export AUTH_TOKEN=4783498748dsa97198dnsfsnmncmsd
```
Now, you can source the **.env** file so that the environment variables are available to your operating system.
```bash
source .env
```
**How to send WhatsApp messages using Python?**
Using the Twilio API makes sending messages from a Python script simple. First, create a **main.py** file in the directory:
```bash
touch main.py
```
Now add the following content inside the file:
```python
import os
from twilio.rest import Client
account_sid = os.environ.get('ACCOUNT_SID')
auth_token = os.environ.get('AUTH_TOKEN')
client = Client(account_sid, auth_token)
```
First, we import the Python in-built `os` library and the Client object from the `twilio` Python package. We load the two environment variables and a Client object is instantiated with the Account SID and the Auth token.
Now you can use this client object to send WhatsApp messages. Copy and paste this code into the **main.py** file, below the other code:
```python
client.messages.create(
body="I am using Twilio",
from_="whatsapp:14155238886", # Don't change this
to="whatsapp:+911234567890" # Replace with your number
)
```
When you run the Python file, your message will be sent to the given number.
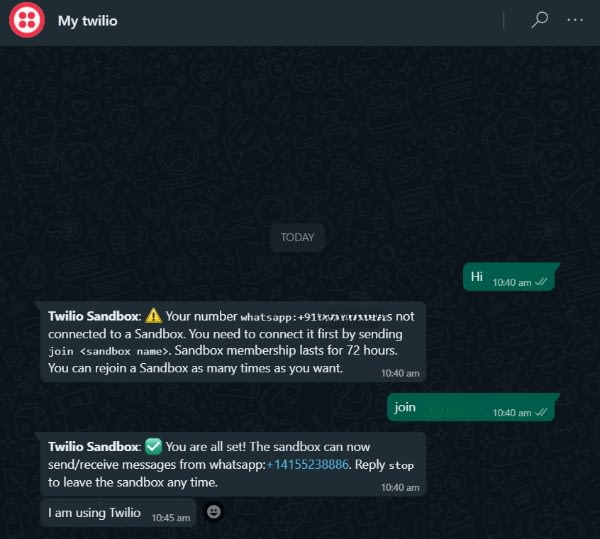
**Note:** Make sure your WhatsApp number is connected to your Twilio.
## Send Birthday Wish Using WhatsApp
Now that we're able to send messages on WhatsApp, let's create a function to send birthday wishes on WhatsApp. Create a **wisher.py** file and add the following code inside that:
```python
def send_birthday_wish(client, recipient_number, recipient_name):
birthday_wish = f"Hey {recipient_name}, Happy Birthday to you from Ashutosh!"
try:
client.messages.create(
body=birthday_wish,
from_="whatsapp:+14155238886",
to=f"whatsapp:{recipient_number}"
)
print("Message sent to", recipient_name,
"on WhatsApp number", recipient_number)
return True
except Exception:
print("Something went wrong. Birthday message not sent.")
return False
```
In the above function, we first define the **birthday\_wish** variable. Then, we create the message using the same syntax we used before to interact with Twilio’s **Client** object. For testing purposes, use the Twilio Sandbox WhatsApp number as the **from\_** number. We have wrapped the message sending flow inside a **try/except** block.
## Read Birthday Data from CSV File
We will be storing the birthday data in a CSV file to keep things simple.
The recipient's name, date of birth, and WhatsApp number will be listed in three columns in the CSV file. There is no limit to the number of rows you may add; each row represents a single person. You may easily update the CSV file later.
Use this command to create a fresh CSV file in your directory:
```bash
touch data.csv
```
Open the file and add your data in the following format:
```txt
Name,Bday,Number
Ashutosh,24-08-1999,+91543212345
Bobby,25-08-1999,+911234567890
```
Note that there are no spaces in between the data points, just commas. Also, you can use your WhatsApp number in order to test the flow.
The **pandas** package we previously installed may now be used to import the CSV file into the **main.py** file. We can create a dataframe from the data in the CSV file with the help of the **pandas** package.
Import the **pandas** and **datetime** libraries first.
```python
from datetime import datetime
import os
import pandas as pd
from twilio.rest import Client
```
ds
```python
def create_birthdays_dataframe():
try:
birthdays_df = pd.read_csv("data.csv")
birthdays_df["Bday"] = pd.to_datetime(birthdays_df["Bday"], format="%d-%m-%Y")
return birthdays_df
except Exception as e:
print("Something went wrong. Birthdays dataframe not created.")
print(repr(e))
return False
```
The birthdays\_df object in the code above is a pandas dataframe that represents the data in our data.csv file. We have converted the **Bday** string to datetime object using the `pd.to_datetime()` function. The try/except block that surrounds the date parsing code in the CSV file will display an error message to the console if something goes wrong.
## Checking for birthdays
Now that we have our functions ready to convert the data into dataframe and send birthday wishes, we are left to add a check for birthdays for each day. Let's create a function for that as well.
```python
def check_for_birthdays():
try:
birthdays_df = create_birthdays_dataframe()
birthdays_df["day"] = birthdays_df["Bday"].dt.day
birthdays_df["month"] = birthdays_df["Bday"].dt.month
today = datetime.now()
for i in range(birthdays_df.shape[0]):
birthday_day = birthdays_df.loc[i, "day"]
birthday_month = birthdays_df.loc[i, "month"]
if today.day == birthday_day and today.month == birthday_month:
send_birthday_wish(
client,
birthdays_df.loc[i, "Number"],
birthdays_df.loc[i, "Name"]
)
return True
except Exception:
print("Something went wrong. Birthday check not successful.")
return False
```
The above function compares the day and month of each row of our CSV file against the current day and month. If the day and month match, the function calls the `send_birthday_wish()` function to send the birthday wish.
Let's call the function at the bottom of the file and run the file:
```python
from datetime import datetime
import os
import pandas as pd
from twilio.rest import Client
from wisher import send_birthday_wish
account_sid = os.environ.get('ACCOUNT_SID')
auth_token = os.environ.get('AUTH_TOKEN')
client = Client(account_sid, auth_token)
def create_birthdays_dataframe():
try:
birthdays_df = pd.read_csv("data.csv")
birthdays_df["Bday"] = pd.to_datetime(birthdays_df["Bday"], format="%d-%m-%Y")
return birthdays_df
except Exception as e:
print(e)
print("Something went wrong. Birthdays dataframe not created.")
return False
def check_for_birthdays():
try:
birthdays_df = create_birthdays_dataframe()
birthdays_df["day"] = birthdays_df["Bday"].dt.day
birthdays_df["month"] = birthdays_df["Bday"].dt.month
today = datetime.now()
for i in range(birthdays_df.shape[0]):
birthday_day = birthdays_df.loc[i, "day"]
birthday_month = birthdays_df.loc[i, "month"]
if today.day == birthday_day and today.month == birthday_month:
send_birthday_wish(
client,
birthdays_df.loc[i, "Number"],
birthdays_df.loc[i, "Name"]
)
return True
except Exception:
print("Something went wrong. Birthday check not successful.")
return False
check_for_birthdays()
```
Now, you can run the file and test the flow:
```bash
python main.py
```
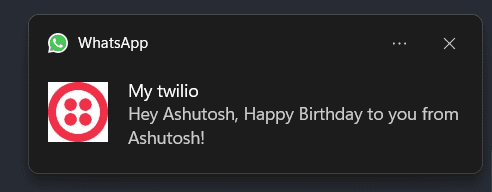
You can see we have received the birthday wish message on WhatsApp.
## Schedule the birthday checker using APScheduler
As we talked in the very beginning of the article, we might need to send these messages at a specific time, say 12:00 AM in the morning. This can be done using APScheduler. We can schedule the `check_for_birthdays()` function to run at a specific time we want.
Let's import the **BackgroundScheduler** object from the APScheduler package in **main.py**:
```python
from datetime import datetime
import os
import pandas as pd
from twilio.rest import Client
from apscheduler.schedulers.background import BackgroundScheduler # Add this line
from wisher import send_birthday_wish
```
Now instead of calling our function manually, we will use an instance of `BackgroundScheduler` to do so.
```python
scheduler = BackgroundScheduler()
job = scheduler.add_job(check_for_birthdays, 'cron',
day_of_week='mon-sun', hour=0, minute=0)
scheduler.start()
```
We call the **scheduler**object’s **add\_job()**method which defines when and how to run the **check_for\_birthdays()** function.
If we run the **main.py** file from our command line now, as we’ve been doing, it will execute the job once and then the program will terminate. We need a way to keep the file running indefinitely so that the script will run every day at 12:00am. To do this, we’ll set up a web server using Flask. If you're new to Flask, you can go through [this article](https://blog.ashutoshkrris.in/getting-started-with-flask) to get started.
```python
from datetime import datetime
import os
import pandas as pd
from twilio.rest import Client
from apscheduler.schedulers.background import BackgroundScheduler
from flask import Flask
from wisher import send_birthday_wish
account_sid = os.environ.get('ACCOUNT_SID')
auth_token = os.environ.get('AUTH_TOKEN')
client = Client(account_sid, auth_token)
app = Flask(__name__)
def create_birthdays_dataframe():
try:
birthdays_df = pd.read_csv("data.csv")
birthdays_df["Bday"] = pd.to_datetime(birthdays_df["Bday"], format="%d-%m-%Y")
return birthdays_df
except Exception as e:
print(e)
print("Something went wrong. Birthdays dataframe not created.")
return False
def check_for_birthdays():
try:
birthdays_df = create_birthdays_dataframe()
birthdays_df["day"] = birthdays_df["Bday"].dt.day
birthdays_df["month"] = birthdays_df["Bday"].dt.month
today = datetime.now()
for i in range(birthdays_df.shape[0]):
birthday_day = birthdays_df.loc[i, "day"]
birthday_month = birthdays_df.loc[i, "month"]
if today.day == birthday_day and today.month == birthday_month:
send_birthday_wish(
client,
birthdays_df.loc[i, "Number"],
birthdays_df.loc[i, "Name"]
)
return True
except Exception:
print("Something went wrong. Birthday check not successful.")
return False
scheduler = BackgroundScheduler()
job = scheduler.add_job(check_for_birthdays, 'cron',
day_of_week='mon-sun', hour=0, minute=0)
scheduler.start()
if __name__ == "__main__":
app.run()
```
You can run the server using the same command:
```bash
python main.py
```
To test the server, you can change the value of hour and minute accordingly. Once the server is up and running, and the given time hits, your message will be sent.
That's it, you have an automatic birthday wisher ready!
**What's next?**
Since the server is still running on your local system, you will have to keep it running. However, you can deploy your application on a cloud server to keep it up and running 24X7. You can use AWS, GCP, or Azure for this purpose. If you find them intimidating, you can also use free hosting platforms like Heroku and PythonAnywhere.
Congratulations! With the help of your automated birthday wisher, you will never again have to worry about forgetting someone's birthday.
You can find the code here: