How To Send Emails Using Python?
Sending emails manually is time-consuming and error-prone, but it’s easy to automate with Python. Imagine a scenario where you can effortlessly send hundreds of customized emails to your customers, automate routine follow-ups, or send birthday wishes automatically, all with the simplicity and elegance of Python code.
In this article, we're going to explore how Python can make your email life more effortless. I'll show you step-by-step how to get started and send plain-text and fancy emails (with attachments too!). All you need is Python installed on your system.
Getting Started
Python comes with a built-in module called smtplib to send emails. It works by following a set of rules called the Simple Mail Transfer Protocol, or SMTP for short. Think of it like a recipe for sending emails. The smtplib module uses the RFC 821 protocol for SMTP.
For our examples, we will use Gmail's SMTP server for sending emails. In the next section, we will set up our Gmail account for sending out emails programmatically.
Setting up Gmail for Sending Emails
Though you can use your personal account to send emails, it's recommended to use a throw-away account for the tutorial. If you're ready with the Gmail account, follow the below steps to get started:
Go to your Google Account Settings.
Choose "Security" and click on "2-Step Verification."
Scroll down to find "App passwords" and select it.
Give the password a name for reference. and click "Generate."
Follow the on-screen instructions and get the 16-character app password.
Click "Done."
Make sure you copy and store the password somewhere safely as you won't be able to see it later.
How To Secure Your Email Connections?
When you're sending emails with Python, it's crucial to keep your messages and login details safe from prying eyes. To do this, you can use encryption to protect your communication. Two common methods for encrypting your email connection are SSL (Secure Sockets Layer) and TLS (Transport Layer Security).
To establish a secure connection with your email server, you have two options:
Using SMTP_SSL()
This method creates a secure connection right from the start, ensuring your communication is encrypted. The default port for this is 465. Thus, if port is zero, or not specified, .SMTP_SSL() will use this standard port for SMTP over SSL.
The following Python code example demonstrates this approach:
import smtplib
import ssl
import os

EMAIL = os.environ.get("EMAIL")
PASSWORD = os.environ.get("PASSWORD")
PORT = 465

context = ssl.create_default_context()

with smtplib.SMTP_SSL("smtp.gmail.com", PORT, context=context) as server:
    server.login(EMAIL, PASSWORD)
    # TODO: Send email here
In the above code, we retrieve the email and password from environment variables, which is a recommended practice for security. It then creates a secure SSL context using ssl.create_default_context(). The with statement sets up the secure connection to the Gmail SMTP server, using the provided server address and port, along with the SSL context to ensure a safe and encrypted connection. Once connected, the script logs in to the email server using the retrieved credentials. Using the with context manager ensures that the connection is closed properly when you're done.
Using .starttls()
This method first establishes an unsecured SMTP connection, and later encrypts using .starttls().
import os
import smtplib
import ssl

SMTP_SERVER = "smtp.gmail.com"
PORT = 587
EMAIL = os.environ.get("EMAIL")
PASSWORD = os.environ.get("PASSWORD")

context = ssl.create_default_context()

with smtplib.SMTP(SMTP_SERVER, PORT) as server:
    server.ehlo()
    server.starttls(context=context)  # Secure the connection
    server.ehlo()
    server.login(EMAIL, PASSWORD)
    # TODO: Send an email here
Within the with statement, the script initializes the connection to the SMTP server, introduces itself with server.ehlo(), secures the connection with server.starttls(context=context) for encryption, and logs in using the provided email and password.
You don't need to use .helo()(for SMTP) or .ehlo()(for ESMTP) explicitly because they are automatically called by .starttls() and .sendmail() if required. These functions handle the SMTP service extensions of the server, so you can generally omit using .helo() or .ehlo() unless you specifically need to check those extensions.
Note: The above snippets use environment variables to store the email and password securely. You can create a
.envfile and set the values ofPASSWORD. Then, you need to runsource .envon your terminal to load these values. You can read more about them here.
How To Send Plain-Text Emails?
Now that you've learned how to secure your SMTP connection, you're all set to send your first email using Python. Please note that we'll use .starttls() to encrypt the connection in the examples that follow.
To send an email, Python provides the sendmail() function, which does exactly what its name suggests: it sends an email. Here's the syntax of the sendmail() function:
sendmail(sender_email, receiver_email, message)
sender_email: The email address of the sender.receiver_email: The email address of the recipient.message: The email content you want to send.
Now, let's send our very first email:
import os
import smtplib
import ssl

SMTP_SERVER = "smtp.gmail.com"
PORT = 587
EMAIL = os.environ.get("EMAIL")
PASSWORD = os.environ.get("PASSWORD")

context = ssl.create_default_context()

with smtplib.SMTP(SMTP_SERVER, PORT) as server:
    server.starttls(context=context)
    server.login(EMAIL, PASSWORD)
    message = """\
    Subject: My First Email

    Hello there, this is my first email sent using Python.
    """
    server.sendmail(EMAIL, "sogiho2398@weirby.com", message)
The message variable holds the content of the email, including the subject and the body of the message. The message starts with "Subject: My First Email" followed by two newlines(\n). This ensures My First Email shows up as the subject of the email, and the text following the newlines will be treated as the message body.
Then the server.sendmail() function is used to send the email from the sender's address to the recipient's address ("sogiho2398@weirby.com" in this case), along with the message content.
How To Send Fancy Emails?
In the previous section, you learned how you can send plain-text emails using Python. But, you won't always want to send those boring emails, right? Using Python, you can send emails with attachments as well as HTML content(yes, those fancy emails that have filled your inbox).
The built-in email package in Python enables you to create more fancy emails, which can be subsequently sent using the smtplib module, as you've already seen. In the following sections, you'll learn how to utilize the email package to send emails with HTML content and attachments, adding an extra layer of versatility to your email-sending capabilities.
Multipurpose Internet Mail Extensions (MIME)
The most common type of email we use today is called MIME (Multipurpose Internet Mail Extensions) Multipart email. It's like an email that can have different parts, like both regular text and fancy HTML. Python has a special module called email.mime that helps us create these kinds of emails. With it, we can make emails that look nice, have plain text, and even attach things like pictures or documents. This is how we send cool newsletters, attachments, or emails with both simple text and pretty pictures. It's a crucial tool for making emails more interesting and useful. If you need more information on how to use it, you can find detailed instructions in the official documentation.
Including Attachments
In this section, we'll explore how to send emails with attachments using Python. Sending emails with attachments can be incredibly useful, especially when you need to share files or documents. We'll use the email and smtplib modules to accomplish this.
The following code shows how you can send an email with an image attachment:
import os
import smtplib
import ssl
from email import encoders
from email.mime.base import MIMEBase
from email.mime.multipart import MIMEMultipart
from email.mime.text import MIMEText
SMTP_SERVER = "smtp.gmail.com"
PORT = 587
EMAIL = os.environ.get("EMAIL")
PASSWORD = os.environ.get("PASSWORD")
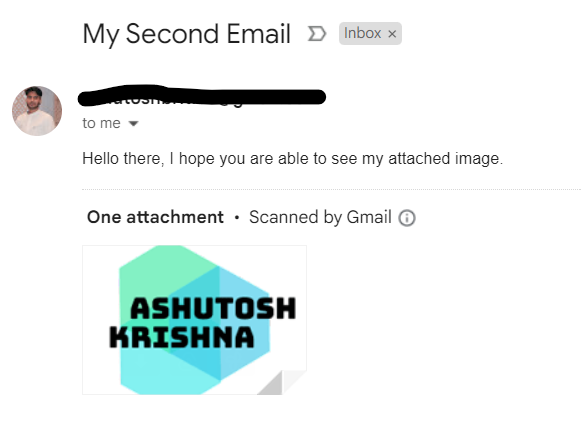
subject = "My Second Email"
body = "Hello there, I hope you are able to see my attached image."
receiver_email = "sogiho2398@weirby.com"
message = MIMEMultipart()
message["From"] = EMAIL
message["To"] = receiver_email
message["Subject"] = subject
message.attach(MIMEText(body, "plain"))
filename = "image.png"
with open(filename, "rb") as attachment:
part = MIMEBase("application", "octet-stream")
part.set_payload(attachment.read())
encoders.encode_base64(part)
part.add_header(
"Content-Disposition",
f"attachment; filename= {filename}",
)
message.attach(part)
text = message.as_string()
context = ssl.create_default_context()
with smtplib.SMTP_SSL(SMTP_SERVER, PORT, context=context) as server:
server.login(EMAIL, PASSWORD)
server.sendmail(EMAIL, receiver_email, text)
The above code uses the MIMEMultipart class to structure the email, providing fields for sender, recipient, and subject. The email's body is added using MIMEText. To attach a file, it selects the file ("image.png" in this case), encodes it using base64 encoding, and attaches it to the email. This step allows you to include files like images, documents, or any binary data. The email message is then converted to a string for transmission.
Here's how you email should look:
Including HTML Content
HTML emails are a powerful way to create visually appealing messages with various formatting and styling options. You can define the HTML content in the same Python file or in a different HTML file itself. But it would be ideal to separate it from your Python code, else the code will grow longer.
Here's the code that demonstrates how to send HTML emails:
import os
import smtplib
import ssl
from email.mime.multipart import MIMEMultipart
from email.mime.text import MIMEText
SMTP_SERVER = "smtp.gmail.com"
PORT = 587
EMAIL = os.environ.get("EMAIL")
PASSWORD = os.environ.get("PASSWORD")
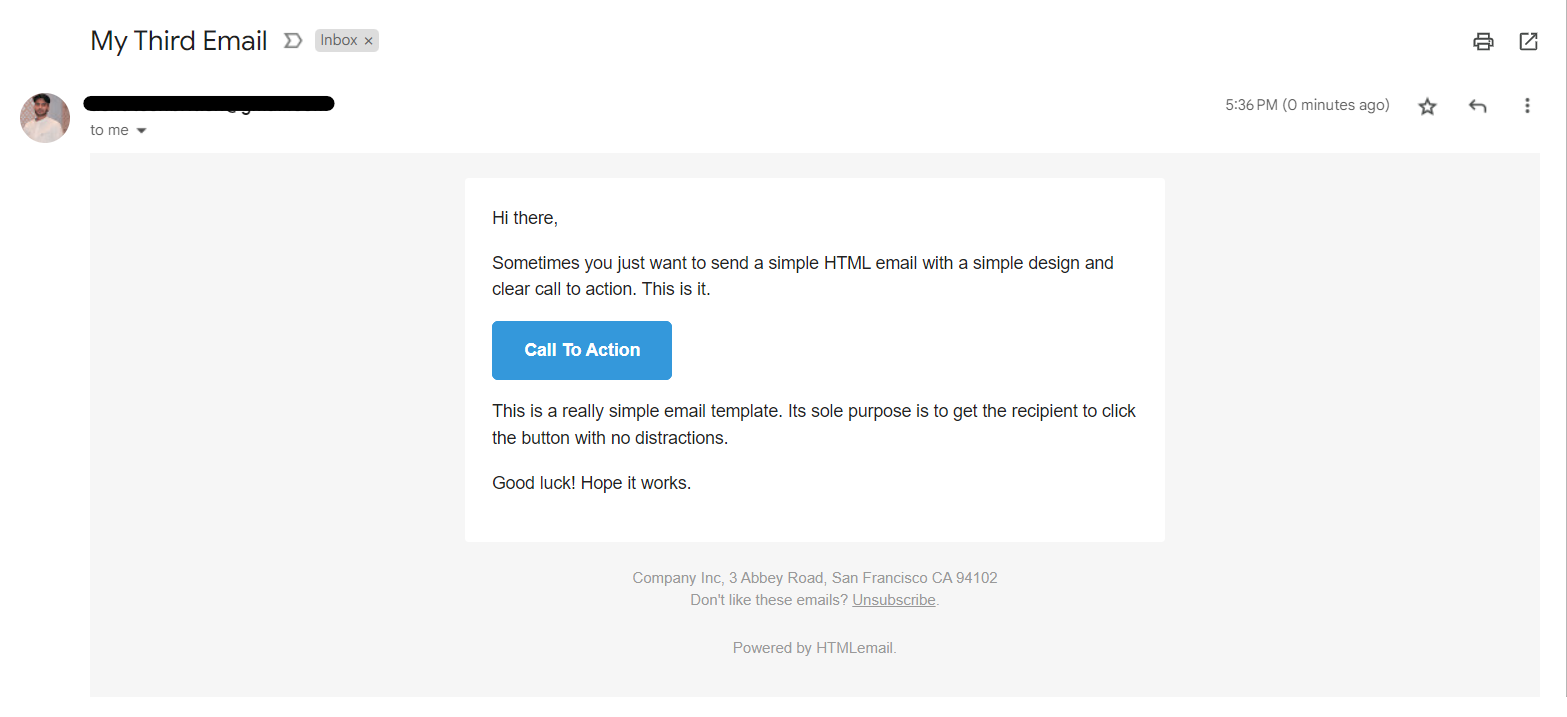
subject = "My Third Email"
receiver_email = "sogiho2398@weirby.com"
message = MIMEMultipart("alternative")
message["From"] = EMAIL
message["To"] = receiver_email
message["Subject"] = subject
filename = "email.html"
text = """\
Hi there,
Sometimes you just want to send a simple HTML email with a simple design and clear call to action. This is it.
This is a really simple email template. Its sole purpose is to get the recipient to click the button with no distractions.
Good luck! Hope it works.
"""
with open(filename, "r") as file:
html = file.read()
part1 = MIMEText(text, "plain")
part2 = MIMEText(html, "html")
message.attach(part1)
message.attach(part2)
text = message.as_string()
context = ssl.create_default_context()
with smtplib.SMTP(SMTP_SERVER, PORT) as server:
server.starttls(context=context)
server.login(EMAIL, PASSWORD)
server.sendmail(EMAIL, receiver_email, text)
To structure the email, we use MIMEMultipart("alternative"), enabling the inclusion of both plain text and HTML content. We read the HTML content from a file "email.html". You can get the contents of this HTML file from here. We also create two parts - one for plaintext and one for HTML. This is required as not all email clients display HTML content by default. The message is finally converted into text and the email is sent.
Here's how your HTML email looks like:
How To Send Bulk Emails?
In many real-world scenarios, sending a single email is not sufficient. Whether you're managing a mailing list, delivering regular updates to subscribers, or sending notifications to a large number of recipients, there comes a time when you need to send multiple emails efficiently. In this section, we will learn how to read a CSV file and send them personalized emails.
Let's start with creating a CSV file called "receivers.csv" and add the following content:
name,email,designation,salary
Person 1,sogiho2398@weirby.com,Application Developer I,20000 USD
Person 2,sogiho2398@weirby.com,Application Developer II,30000 USD
Person 3,sogiho2398@weirby.com,Application Developer III,50000 USD
Person 4,sogiho2398@weirby.com,Application Developer IV,80000 USD
Make sure you separate the values with commas(,).
Next, let's read this file and iterate over the values:
import csv


with open("receivers.csv", "r") as file:
    reader = csv.reader(file)
    next(reader)
    for name, email, designation, salary in reader:
        print(f"Sending email to {name} on email: {email}")
        # TODO: Send email
The above code reads the "receivers.csv" file and iterates over the CSV data. It skips the header row using next(reader). For each subsequent row, it extracts the name, email, designation, and salary.
Let us now send the emails to the users:
import csv
import os
import smtplib
import ssl

SMTP_SERVER = "smtp.gmail.com"
PORT = 587
EMAIL = os.environ.get("EMAIL")
PASSWORD = os.environ.get("PASSWORD")

context = ssl.create_default_context()

with smtplib.SMTP(SMTP_SERVER, PORT) as server:
    server.starttls(context=context)
    server.login(EMAIL, PASSWORD)

    with open("receivers.csv", "r") as file:
        reader = csv.reader(file)
        next(reader)
        for name, email, designation, salary in reader:
            message = f"""\
            Subject: {name}, you're hired!

            Hi {name}

            Congratulations, you're hired for the role of {designation}. Your salary will be {salary}.

            Thanks
            HR
            """
            server.sendmail(EMAIL, email, message)
In each iteration, we construct the personalized message using f-strings and send the message to the respective users.
Conclusion
In this article, we've explored how Python can be used to send emails in different ways. We've learned how to make email connections secure, send emails with fancy designs or attachments, and even send emails to many people at once.
Python's tools make it easy to send various types of emails, whether for personal use or in a professional setting. This can save time and make your messages more engaging. In a world where email is a crucial part of our daily lives, Python offers you the ability to send emails efficiently and effectively, no matter your background or needs.