How to Build a GUI Quiz Application using Tkinter and Open Trivia DB

Introduction
In this blog, we’ll learn to build a Graphical User Interface (GUI) Quiz Application using the Tkinter Python built-in module.
The project is inspired from Angela Yu's 100 Days of Python course available on Udemy here.
The task is to ask multiple-choice questions, collect user answers and finally display the results. Before coding the GUI, we’ll first see how to fetch multiple-choice questions, their correct answers, and the choices from the Open Trivia DB API. The Open Trivia Database provides a completely free JSON API for use in programming projects. Use of this API does not require an API Key.
To make the task more interesting, we’ll also randomize the order of choices.
Watch the demo video to see what we’re building:
Libraries and Tools Required
We'll use the following modules and concepts in this project:
- tkinter is a standard GUI library for Python using which we can build desktop apps. This is the base of our project and we'll use it to create the User Interface of the application.
- random module implements pseudo-random number generators for various distributions. This module will help us shuffle the options for the questions.
- requests library allows us to send HTTP/1.1 requests extremely easily. We'll need the library to fetch questions from the Open Trivia DB.
- Python Classes are a blueprint for creating objects. Objects are real-world entities. During the entire project development, we'll be separating our different functionalities into different classes and methods.
Workflow of the Project
The basic workflow of the application will go like this:
- We'll fetch questions from the Open Trivia DB API.
- For each fetched question, we'll create a different object using a Question class. All these Question objects will be appended to a
question_banklist. - This
question_bankwill be passed to the brain of the application, QuizBrainand aquizobject will be created.This class will be responsible for checking if there are more questions, for getting the next question, calculating the score, and so on. - Finally, this
quizobject will be passed to the QuizInterface class, and the user will be able to interact with it.
Alright, let's get started!
Fetching Questions
As we discussed above, we’ll be using the Open Trivia DB API to get the questions. Head over to their API, select the number of questions, category, and difficulty. The question type should be Multiple Choice and the encoding should be Default Encoding. Click on Generate API URL and you’ll get an API URL.
Sample API URL: <https://opentdb.com/api.php?amount=10&type=multiple>
For fetching the questions, we'll be using the requests module. You can install it like this:
$ pip install requests
Let's create a Python file quiz_data.py to fetch the quiz questions and answers using the API URL generated above.
import requests

parameters = {
    "amount": 10,
    "type": "multiple"
}

response = requests.get(url="https://opentdb.com/api.php", params=parameters)
question_data = response.json()["results"]
In the above script, instead of directly adding the amount and type parameters in the URL, we have created a parameters dictionary and added the respective values.
After that, we're making a GET request using the requests library on the Open Trivia DB API URL. A sample JSON response looks like this:
{
  "response_code": 0,
  "results": [
    {
      "category": "Entertainment: Video Games",
      "type": "multiple",
      "difficulty": "hard",
      "question": "What was the name of the hero in the 80s animated video game 'Dragon's Lair'?",
      "correct_answer": "Dirk the Daring",
      "incorrect_answers": ["Arthur", "Sir Toby Belch", "Guy of Gisbourne"]
    },
    {
      "category": "Entertainment: Video Games",
      "type": "multiple",
      "difficulty": "medium",
      "question": "Which of these game franchises were made by Namco?",
      "correct_answer": "Tekken",
      "incorrect_answers": ["Street Fighter", "Mortal Kombat", "Dragon Quest"]
    }
  ]
}
The JSON data contains a dictionary with two keys: response_code and results. The response_code tells developers what the API is doing. The results is a list we are interested in. So, we have stored the value of results in a variable called question_data.
Question Model
Question model is nothing but a Python class with three attributes — question_text, correct_answer and choices. question_text is the question, correct_answer is the correct answer for that question and choices is a list of options for that question.
Let’s create a question_model.py file and create the class in it:
class Question:
    def __init__(self, question: str, correct_answer: str, choices: list):
        self.question_text = question
        self.correct_answer = correct_answer
        self.choices = choices
Quiz Brain
The QuizBrain, as the name suggests, is the brain of the application. Let's create quiz_brain.py file and add the following code there:
class QuizBrain:

    def __init__(self, questions):
        self.question_no = 0
        self.score = 0
        self.questions = questions
        self.current_question = None

    def has_more_questions(self):
        """To check if the quiz has more questions"""

        return self.question_no < len(self.questions)

    def next_question(self):
        """Get the next question by incrementing the question number"""

        self.current_question = self.questions[self.question_no]
        self.question_no += 1
        q_text = self.current_question.question_text
        return f"Q.{self.question_no}: {q_text}"

    def check_answer(self, user_answer):
        """Check the user's answer against the correct answer and maintain the score"""

        correct_answer = self.current_question.correct_answer
        if user_answer.lower() == correct_answer.lower():
            self.score += 1
            return True
        else:
            return False

    def get_score(self):
        """Get the number of correct answers, wrong answers, and score percentage."""

        wrong = self.question_no - self.score
        score_percent = int(self.score / self.question_no * 100)
        return (self.score, wrong, score_percent)
The QuizBrain class takes questions, a list of questions. Additionally, the question_no and score attributes are initialized with 0 and the current_question is set to None initially.
The first method has_more_questions() checks whether the quiz has more questions or not.
The next method next_question() gets the question from the questions list at index question_no and then increments the question_no attribute and returns a formatted question.
The check_answer() method takes user_answer as an argument and checks whether the user's answer is correct or not. It also maintains the score and returns boolean values.
The last method get_score() returns the number of correct answers, wrong answers, and score percentage.
Quiz UI
Let’s move to the next part where we create the user interface of the application. Create a quiz_ui.py file and add the following content:
class QuizInterface:

    def __init__(self, quiz_brain: QuizBrain) -> None:
        self.quiz = quiz_brain
        self.window = Tk()
        self.window.title("iQuiz App")
        self.window.geometry("850x530")

        # Display Title
        self.display_title()

        # Creating a canvas for question text, and dsiplay question
        self.canvas = Canvas(width=800, height=250)
        self.question_text = self.canvas.create_text(400, 125,
                                                     text="Question here",
                                                     width=680,
                                                     fill=THEME_COLOR,
                                                     font=(
                                                         'Ariel', 15, 'italic')
                                                     )
        self.canvas.grid(row=2, column=0, columnspan=2, pady=50)
        self.display_question()

        # Declare a StringVar to store user's answer
        self.user_answer = StringVar()

        # Display four options(radio buttons)
        self.opts = self.radio_buttons()
        self.display_options()

        # To show whether the answer is correct or wrong
        self.feedback = Label(self.window, pady=10, font=("ariel", 15, "bold"))
        self.feedback.place(x=300, y=380)

        # Next and Quit Button
        self.buttons()

        # Mainloop
        self.window.mainloop()
In the above code, we've created a QuizInterface class with a constructor. In Python, the __init__() method is called constructor and is called automatically whenever an object of that class is created.
As discussed in the workflow, the QuizInterface class takes an argument of type QuizBrain. So, within the constructor, we have passed that as quiz_brain.
The first thing we do in Tkinter is creating a window using the Tk class. You can set the title and the geometry using the title() and geometry() methods respectively.
Next, we called a few methods which we'll be creating next. Apart from that, we've created a canvas using the Canvas class where our questions will be placed. Canvas is a rectangular area where we can place text, graphics, widgets, and so on.
Inside the canvas, we added a sample text for now using the create_text() method. We then declared a StringVar variable called user_answer to store the user's answer in String type.
Next, we created a feedback label to show whether the answer is right or wrong using the Label widget. This widget implements a display box where we can place text or images. You can update the text displayed by this widget at any time you want.
At the very end, we enter the main event loop to take action against each event triggered by the user using the mainloop() method. Now, let's create the other methods that we'll use in this constructor.
To display the title
def display_title(self):
    """To display title"""

    title = Label(self.window, text="iQuiz Application",
                      width=50, bg="green", fg="white", font=("ariel", 20, "bold"))
    title.place(x=0, y=2)
To display a title, we have created a Label widget on the main window. We set its width, bg, fg and font properties and it looks something like this:

To display a question
As we know, we have already created a canvas for the question text. Since the question_no is initialized with 0 in the QuizBrain class, we can get the questions using the next_question() method:
def display_question(self):
    """To display the question"""

    q_text = self.quiz.next_question()
    self.canvas.itemconfig(self.question_text, text=q_text)
Using the itemconfig() method in the Canvas class, we can add question text dynamically.
To create the radio buttons
Since the options will be four radio buttons, we'll be using the RadioButton class from the Tkinter module.
def radio_buttons(self):
        """To create four options (radio buttons)"""
    # initialize the list with an empty list of options
    choice_list = []

    # position of the first option
    y_pos = 220

    # adding the options to the list
    while len(choice_list) < 4:

        # setting the radio button properties
        radio_btn = Radiobutton(self.window, text="", variable=self.user_answer, value='', font=("ariel", 14))

        # adding the button to the list
        choice_list.append(radio_btn)

        # placing the button
        radio_btn.place(x=200, y=y_pos)

        # incrementing the y-axis position by 40
        y_pos += 40

    # return the radio buttons
    return choice_list
First, we created a choice_list list. We set the y-position of the first choice as 220. Using a while loop, we created four instances of the RadioButton class on the main window. Notice the variable attribute set as user_answer that we created earlier.
We'll append these radio buttons to the choice_list and place them at a distance of 40 units in the y-axis. We then return the choice_list.
To display options
We'll use this method to set the text and value attribute of each radio button.
def display_options(self):
    """To display four options"""

    val = 0

    # deselecting the options
    self.user_answer.set(None)

    # looping over the options to be displayed for the
    # text of the radio buttons.
    for option in self.quiz.current_question.choices:
        self.opts[val]['text'] = option
        self.opts[val]['value'] = option
        val += 1
We first set the user_answer to None. Then we iterate over the choices for the current_question and set the two properties one after another for each option.
To display buttons
As you can see, we've two buttons – Next and Quit.
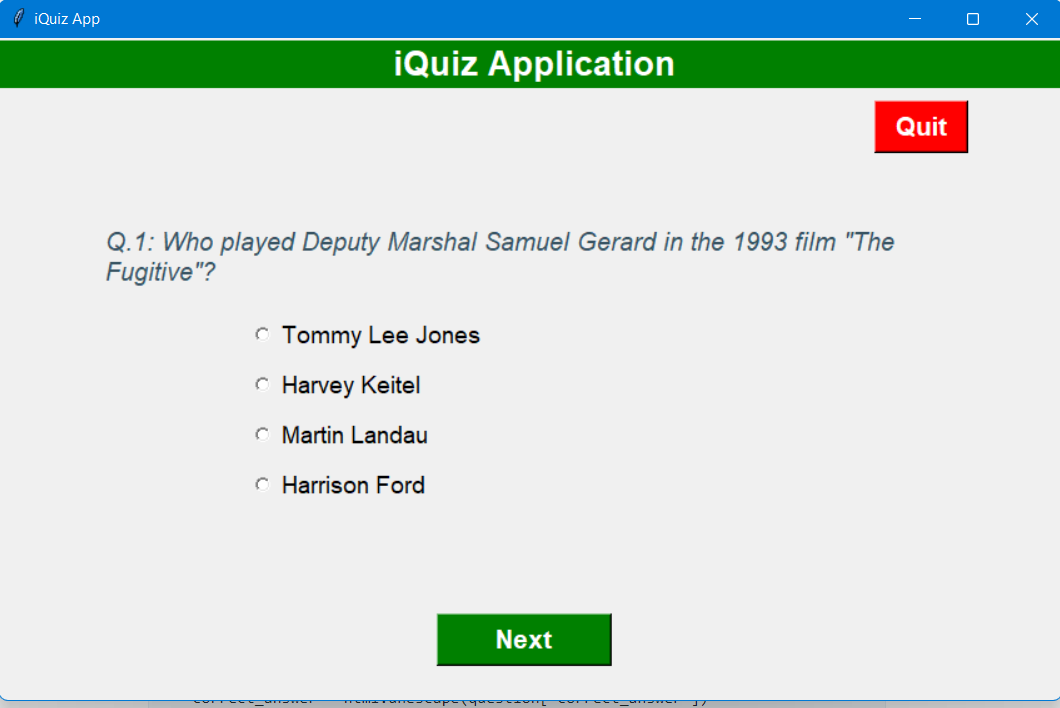
We'll use the Next button to move to the next question (if any). And we'll use the Quit button to quit the quiz and destroy the window immediately.
We use the Button class from the Tkinter module to create them. The functionality for these buttons is added in the command attribute.
For the Next button, we'll be creating a separate method right after this section. For the Quit button, we just destroy the main window.
Next button functionality
def next_btn(self):
    """To show feedback for each answer and keep checking for more questions"""

    # Check if the answer is correct
    if self.quiz.check_answer(self.user_answer.get()):
        self.feedback["fg"] = "green"
        self.feedback["text"] = 'Correct answer! \U0001F44D'
    else:
        self.feedback['fg'] = 'red'
        self.feedback['text'] = ('\u274E Oops! \n'
                                     f'The right answer is: {self.quiz.current_question.correct_answer}')

    if self.quiz.has_more_questions():
        # Moves to next to display next question and its options
        self.display_question()
        self.display_options()
    else:
        # if no more questions, then it displays the score
        self.display_result()

        # destroys the self.window
        self.window.destroy()
The next button has to do a lot of things.
First of all, it checks whether the answer selected by the user is correct or not using the check_answer method. It shows the feedback accordingly.
Next, it checks if the quiz has more questions or not. If there are more questions, it calls the display_question and display_options methods again. If there are no questions left, it calls the display_result method to show the result and then destroys the main window.
To display the results
At the end of the quiz, we need to show the results to the user like this:
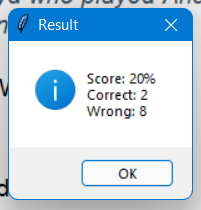
Here, as you can see, we are showing the score percentage based on correct answers and wrong answers.
def display_result(self):
    """To display the result using messagebox"""
    correct, wrong, score_percent = self.quiz.get_score()

    correct = f"Correct: {correct}"
    wrong = f"Wrong: {wrong}"

    # calculates the percentage of correct answers
    result = f"Score: {score_percent}%"

    # Shows a message box to display the result
    messagebox.showinfo("Result", f"{result}\n{correct}\n{wrong}")
We use the get_score method to get the computations and then we use the showinfo method from the messagebox class to show such a popup message.
Full code for quiz_ui.py
from tkinter import Tk, Canvas, StringVar, Label, Radiobutton, Button, messagebox
from quiz_brain import QuizBrain

THEME_COLOR = "#375362"


class QuizInterface:

    def __init__(self, quiz_brain: QuizBrain) -> None:
        self.quiz = quiz_brain
        self.window = Tk()
        self.window.title("iQuiz App")
        self.window.geometry("850x530")

        # Display Title
        self.display_title()

        # Create a canvas for question text, and dsiplay question
        self.canvas = Canvas(width=800, height=250)
        self.question_text = self.canvas.create_text(400, 125,
                                                     text="Question here",
                                                     width=680,
                                                     fill=THEME_COLOR,
                                                     font=(
                                                         'Ariel', 15, 'italic')
                                                     )
        self.canvas.grid(row=2, column=0, columnspan=2, pady=50)
        self.display_question()

        # Declare a StringVar to store user's answer
        self.user_answer = StringVar()

        # Display four options (radio buttons)
        self.opts = self.radio_buttons()
        self.display_options()

        # To show whether the answer is right or wrong
        self.feedback = Label(self.window, pady=10, font=("ariel", 15, "bold"))
        self.feedback.place(x=300, y=380)

        # Next and Quit Button
        self.buttons()

        # Mainloop
        self.window.mainloop()

    def display_title(self):
        """To display title"""

        # Title
        title = Label(self.window, text="iQuiz Application",
                      width=50, bg="green", fg="white", font=("ariel", 20, "bold"))

        # place of the title
        title.place(x=0, y=2)

    def display_question(self):
        """To display the question"""

        q_text = self.quiz.next_question()
        self.canvas.itemconfig(self.question_text, text=q_text)

    def radio_buttons(self):
        """To create four options (radio buttons)"""

        # initialize the list with an empty list of options
        choice_list = []

        # position of the first option
        y_pos = 220

        # adding the options to the list
        while len(choice_list) < 4:

            # setting the radio button properties
            radio_btn = Radiobutton(self.window, text="", variable=self.user_answer,
                                    value='', font=("ariel", 14))

            # adding the button to the list
            choice_list.append(radio_btn)

            # placing the button
            radio_btn.place(x=200, y=y_pos)

            # incrementing the y-axis position by 40
            y_pos += 40

        # return the radio buttons
        return choice_list

    def display_options(self):
        """To display four options"""

        val = 0

        # deselecting the options
        self.user_answer.set(None)

        # looping over the options to be displayed for the
        # text of the radio buttons.
        for option in self.quiz.current_question.choices:
            self.opts[val]['text'] = option
            self.opts[val]['value'] = option
            val += 1

    def next_btn(self):
        """To show feedback for each answer and keep checking for more questions"""

        # Check if the answer is correct
        if self.quiz.check_answer(self.user_answer.get()):
            self.feedback["fg"] = "green"
            self.feedback["text"] = 'Correct answer! \U0001F44D'
        else:
            self.feedback['fg'] = 'red'
            self.feedback['text'] = ('\u274E Oops! \n'
                                     f'The right answer is: {self.quiz.current_question.correct_answer}')

        if self.quiz.has_more_questions():
            # Moves to next to display next question and its options
            self.display_question()
            self.display_options()
        else:
            # if no more questions, then it displays the score
            self.display_result()

            # destroys the self.window
            self.window.destroy()

    def buttons(self):
        """To show next button and quit button"""

        # The first button is the Next button to move to the
        # next Question
        next_button = Button(self.window, text="Next", command=self.next_btn,
                             width=10, bg="green", fg="white", font=("ariel", 16, "bold"))

        # palcing the button on the screen
        next_button.place(x=350, y=460)

        # This is the second button which is used to Quit the self.window
        quit_button = Button(self.window, text="Quit", command=self.window.destroy,
                             width=5, bg="red", fg="white", font=("ariel", 16, " bold"))

        # placing the Quit button on the screen
        quit_button.place(x=700, y=50)

    def display_result(self):
        """To display the result using messagebox"""
        correct, wrong, score_percent = self.quiz.get_score()

        correct = f"Correct: {correct}"
        wrong = f"Wrong: {wrong}"

        # calculates the percentage of correct answers
        result = f"Score: {score_percent}%"

        # Shows a message box to display the result
        messagebox.showinfo("Result", f"{result}\n{correct}\n{wrong}")
Putting Everything Together
Since all the components are ready to be integrated together, let's create a main.py file and add the following content there:
from question_model import Question
from quiz_data import question_data
from quiz_brain import QuizBrain
from quiz_ui import QuizInterface
from random import shuffle
import html

question_bank = []
for question in question_data:
    choices = []
    question_text = html.unescape(question["question"])
    correct_answer = html.unescape(question["correct_answer"])
    incorrect_answers = question["incorrect_answers"]
    for ans in incorrect_answers:
        choices.append(html.unescape(ans))
    choices.append(correct_answer)
    shuffle(choices)
    new_question = Question(question_text, correct_answer, choices)
    question_bank.append(new_question)


quiz = QuizBrain(question_bank)

quiz_ui = QuizInterface(quiz)


print("You've completed the quiz")
print(f"Your final score was: {quiz.score}/{quiz.question_no}")
We first imported all the classes from the different files we created above. In addition to that, we also need the shuffle method from the random module and the html module.
We have a list called question_bank. We are iterating over the question_data that we receive from the quiz_data.py file. If you see the sample response, you will find some text such as 'Dragon'. These need to be unescaped using the html.unescape method.
We have a choices list that will contain the correct answer as well as the incorrect answers. The list will be shuffled using the shuffle method from the random module.
After shuffling, we create a question using the Question model from quiz_model.py file and append it the question_bank list.
Next, we're creating an object called quiz of the QuizBrain class which requires a list of questions. So, we're passing the question_bank to it.
After that, we're creating an object quiz_ui of the QuizInterface class which requires an object of the QuizBrain class, so we have passed the newly created quiz object to it.
Now that everything is ready, we are ready to run the application.
$ python main.py
Conclusion
Congrats on making it to the end! This was a basic tutorial on how you can build a GUI Quiz application using Tkinter. You can add more features and make the UI more attractive if you want to.
Here's the code repository: https://github.com/ashutoshkrris/GUI-Quiz-Tkinter
For Windows, you can download the executable application from here.